People usually ask one of two questions when they see me:
- “How do you take care of your hair?”
- “What highlighter is that?”
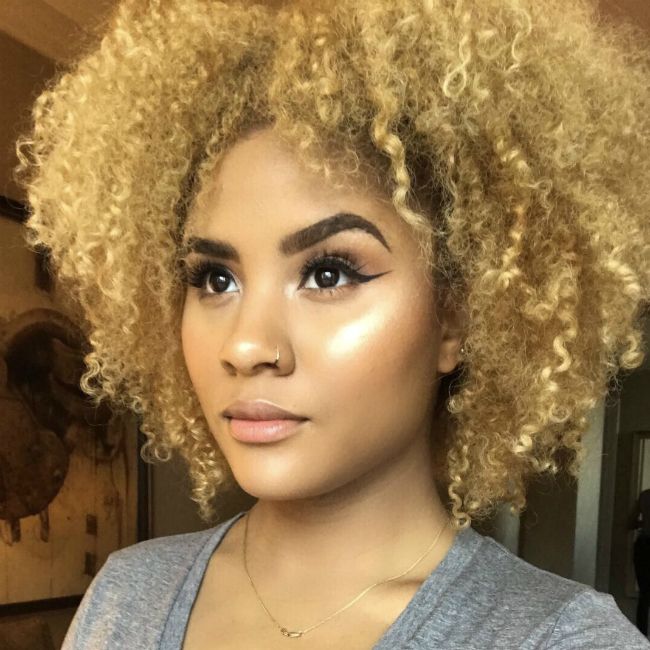
I always laugh at the latter because they usually ask after staring for a few seconds, possibly trying to guess it for themselves. Some people usually have an idea, but even when they don’t, I’m happy to share my favorite highlighters and how I use them.
I have used all kinds of highlighters – liquid, powder, and cream; however, I gravitate towards powder highlighters more. I often layer them to create “custom” shades to really enhance my glow. It depends on how I’m feeling that day!
MAC Cosmetics
I’m a big fan of the MAC Cosmetics Mineralize Skinfinish highlighters, and the Extra Dimension Skinfinish highlighters, which are usually limited edition. These are both powder highlighters and are great for using individually or layering. My favorite Mineralize Skinfinish highlighter is “Gold Deposit,” which reflects golden bronze. I also have two Extra Dimension Skinfinish highlighters in “Oh, Darling” and “Shaft of Gold,” which both came out in Fall 2015. I use these sparingly because I can’t replace them, but can only try to find the next best thing to duplicate them. I shudder when I think of the day.
Anastasia Beverly Hills Cosmetics
I love the Anastasia Beverly Hills Glow Kits for a number of reasons. The powders are silky, easy to blend, and they are great for layering. The kits also cost $40-45 and include 4 to 6 different pans of highlight. This makes the kits stand out because a single highlighter can easily cost $40, so it seems that you are getting more bang for your buck. Although the pans are a bit smaller than a single highlighter, they are enough to last you a while!
The Anastasia Beverly Hills Glow Kits are perfect enough on their own, but layering with That Glow and Ultimate Glow is a great way to really make your presence known. This was the combination I used for the Bella Kinks DFW Natural Hair Expo in Dallas back in October, and it really got people talking! The highlighters from the That Glow kit make a great base for the glittery effect of the highlighters in the Ultimate Glow kit. This combination is not for the faint of heart, so be prepared to really stand out!
How To Apply
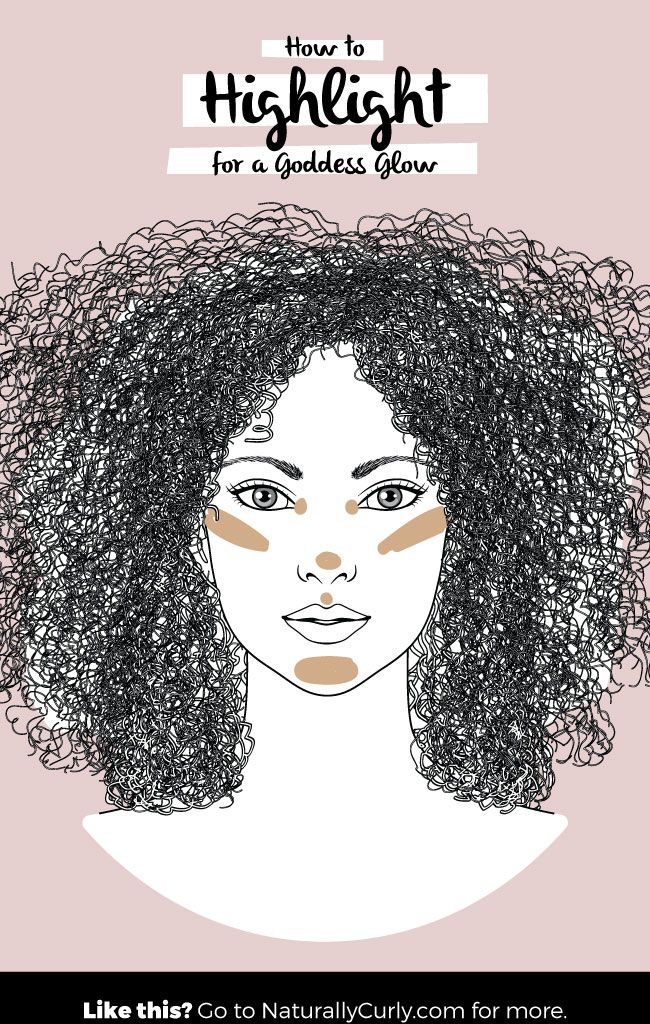
I truly believe that purchasing a great highlighter is half of the job, but properly applying it is the other half. I like to highlight my face last, right before I apply my choice of lip for the day. This includes the highest parts of my cheekbones, the tip of my nose, my chin, inner corners of my eyes, Cupid’s bow, and sometimes my forehead. When highlighting, you want to highlight the parts of your face where the light would normally hit you. This is why it’s important to know your face shape to make sure you’re getting the most out of your glow!
To apply my highlighter, I use a pointed contour or fan brush. I really like the Morphe M438 Pointed Contour Brush because it picks up a lot of product, which allows me to really pack on my highlighter to achieve my ultimate glow.
After swiping the brush in my choice of highlighter, I apply the highlighter to my cheekbones first, which is mainly where I want the light to hit me. I do this in a downward motion towards my blush. Then, I use my blush brush to blend out the line between my highlighter and blush.
After I have applied one highlighter, I find another one and repeat the same steps: swipe my brush across the powder a few times, apply it to the area of choice in a downward motion, and blend it into my blush.
After I have applied my highlighter, I use my MAC Cosmetics Prep + Prime Fix+ Spray to settle my makeup so it doesn’t look powdery. This also causes my highlighters to melt into my skin, which gives it that airbrushed look!
I take my highlighting seriously, as it is my favorite step in the makeup process. So if you’re ever looking for me, my highlighter will surely guide you in the right direction.
Now, go out and glow!
What’s next?
You’ve heard of contouring your face, but did you know you can Contour Your Hair?
We know makeup isn’t everyone’s cup of tea. Switch gears and read a perspective on Alicia Keys’ “No Makeup” Look.
For more informative articles like this, sign up for our newsletter!


